Winter has a way of showing you exactly where a home is vulnerable. The first time I watched a ceiling stain spread, the room was warm and quiet, and the attic above was anything but. A crust of ice had trapped meltwater on the roof. The water had nowhere to go except under the shingles and into the insulation. That leak cost the homeowners far more than a quick response would have, and it took months before the house felt normal again. Ice on a roof is not a cosmetic problem. It is a hydraulic problem. When you understand how that water moves and freezes, you can stop the damage before it spirals.
This guide draws on field experience in cold climates, including dozens of jobs focused on roof ice dam removal, frozen gutter removal, and winter roof leak repair. I will walk through how ice dams form, how professionals remove them without tearing up the roof, where homeowners can safely step in, and what preventive changes make the biggest difference. You will see when emergency ice dam removal is justified, and when patience and a measured plan prevent more damage than brute force ever could.
The anatomy of an ice dam and why leaks follow
An ice dam starts with uneven roof temperatures. Warmth from the living space leaks into the attic and heats the roof deck. Snow on that warmer section melts from the underside, then the meltwater flows down to the colder eave, where the deck hangs over the exterior wall and stays closer to outdoor temperatures. The water refreezes at the edge. Day after day, meltwater runs down and refreezes. A ridge forms. That ridge becomes a dam. The ponded water behind it is what finds a path under shingles, through nail holes, and into the attic and walls. The result is winter water damage roof repairs that often include soaked insulation, stained drywall, curling shingles, and sometimes rotten sheathing if the problem repeats over seasons.
Several variables make the difference between a mild nuisance and a disaster. Deep snow, sunny days with cold nights, and roof designs with valleys, dormers, or short overhangs all increase the risk. If you see thick icicles, especially those forming behind the gutter line or creeping up the shingles, you likely have ice buildup on the roof rather than just decorative icicles. The real clue is water stains on ceilings near exterior walls. That is the textbook pattern of an ice dam leak.
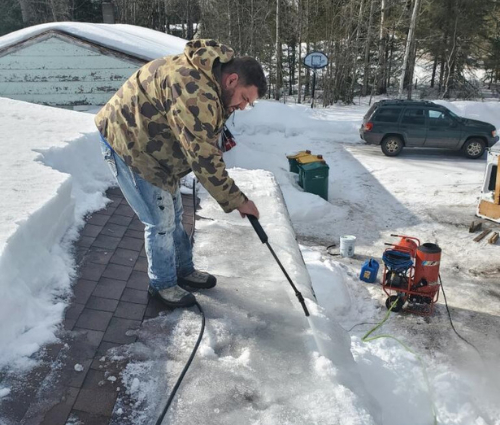
Why speed and method both matter
When water is dripping into a living room or bathroom, the urge is to act fast. That instinct is right, but the method matters more than the rush. I have seen homeowners chip ice with a hatchet, pour rock salt on shingles, or drag a roof rake across a brittle surface during a cold snap. Those fixes often buy a day and cost a season. Shingle granules get scraped off, flashing gets bent, and salt leaves a dead strip on the lawn and stains aluminum gutters.
There is a reason qualified crews use low pressure steam ice removal. Professional ice dam steaming applies steam at relatively low pressure and controlled temperature so the ice releases cleanly without blasting the shingles. Done right, it carves channels through the dam, relieves trapped water, and peels ice from gutters without gouging the metal. The price of an ice dam steam removal service can feel steep, but that cost is small compared to repairs for punctured membranes or broken gutters after aggressive chipping. Safe ice dam removal is not about brute force. It is about managing heat, angle, patience, and water flow.
How professionals approach winter roof ice removal
A seasoned roof ice removal service does not start at the dam itself. They start below the roofline. First, they walk the house, note downspouts, look for gutter pulls, check soffit vents, and ask where the homeowner is seeing stains inside. That quick assessment guides the plan. If the downspouts are frozen solid, water has no exit even if the gutter is open, so frozen downspout removal becomes part of the job. If the gutters brim with ice and are welded to the fascia, the first step is to relieve roof pressure without ripping the gutter loose.
The tools are simple. Steam generator, insulated hoses, roof-safe ladders, fall protection, snow rakes with non-scratch heads, plastic shovels, and often a leaf blower for light powder before steaming begins. The process usually looks like this. They reduce the snow load across the lower third of the roof to lower meltwater. They steam-cut small channels through the ice dam to drain the pond. They remove ice from gutters in sections, never prying, letting heat do the work. Then they address downspouts, working from the bottom up so vented steam softens the plug without shooting slush out onto a sidewalk where it refreezes. That approach qualifies as roof and gutter ice removal, not just cosmetic trimming.
Some crews advertise high pressure hot water. That is not the same as low pressure steam. High pressure can delaminate shingle mats, drive water under laps, and expose nails. I have inspected roofs after that treatment. You can spot the lines where granules vanished, and you can expect a shorter shingle life. If you hire an ice dam removal company, ask them explicitly about their equipment: steam temperature, operating pressure, and how they protect gutters and skylight flashing.
Working around gutters, downspouts, and blockages
Gutters deserve their own conversation. When a homeowner calls a gutter ice removal company, they usually imagine a quick matter with a heat gun. Not so. If the gutter is aluminum and mounted with hidden hangers, it can flex. Ice expands in every direction as it forms. A full trough can spread the back edge and deform the hanger screws. That is how fascia boards crack and gutters sag in spring. A skilled tech will steam the top surface to create a slush layer, then tap gently along the underside to encourage release. If the gutter was installed without an adequate pitch, you will see recurring gutter ice blockage every cold snap because standing water never fully drains before it freezes again.
Downspouts often fail in the first freeze because they trap leaves. Frozen gutter removal without addressing the downspout plug is a half measure. Frozen downspout removal is finicky. You do not want to melt a small section only to refreeze it downstream. The safe method warms the elbow and the vertical sections slowly, bottom up, with towels around the base to contain runoff. Tricky elbows at grade, especially where they discharge into an underground drain, can become a solid ice column. Many of those underground runs are corrugated and easily crushed, so rushing with force is a bad trade. If the pipe is frozen more than a foot or two into the soil, we often leave it and redirect discharge temporarily with an above grade extension until spring.
Emergency ice dam removal: when to call now, not later
Not every ice dam is an emergency. A dam that sits two inches tall on a cold porch roof is different from a ten inch ridge above a vaulted ceiling with can lights. There are clear signs to call for emergency ice dam removal. If water is actively dripping from a ceiling or light fixture, you have a safety issue. If you see a growing stain during the day that fades at night, the dam is mobilizing meltwater in sun and refreezing after dark. If the gutter has already pulled away or you hear creaking under the eave, the mechanical load is risky.
Most companies that specialize in roof ice dam removal triage calls by risk, not by order received. Be ready to describe interior symptoms, roof pitch, access points, and whether a driveway can support a truck and steamer safely. I have driven past jobs because there was no safe ladder setup on glare ice or high wind. The right answer was to stabilize indoors first, then return at dawn when temperatures and wind allowed safe work.
Safe stopgaps while you wait for a crew
Homeowners always ask what they can do in the meantime. There are safe interim steps and a few things I never recommend. If you can access your attic safely and you can spot where water is tracking, move insulation back a foot from the wet area, lay down a plastic sheet on the drywall, then place a tray or bucket to catch drips. That buys time and prevents a saturated batt from spreading moisture. If you own a roof rake designed for snow, you can pull down the loose snow from the first three to four feet of roof, keeping the rake flat so it rides atop the shingles. Do not rake higher on the roof unless you have stable footing and a helper to manage the handle. Clearing this edge reduces meltwater. Avoid salt socks or calcium chloride on shingles. They can streak metal, kill shrubs, and leave residue that corrodes fasteners.
Inside the house, turn down the thermostat a few degrees to slow melt. Counterintuitive, yes, but it reduces attic heat transfer. If you have bath fans that vent into the attic, stop using them until you confirm they vent outdoors. If you have a whole house humidifier, turn it off. Lowering interior humidity cuts frost buildup on the underside of the roof deck, which is a hidden contributor to ice formation.
What a thorough ice dam leak repair entails
Once the exterior ice is managed and the roof is draining again, the interior work starts. Roof leak winter repair during the cold season is partly triage. Dry the structure, stop mold, and keep heat in the home without driving more moisture into the assembly. Then plan permanent fixes for spring. I like to stage the work in three passes. First, containment and drying within 24 to 48 hours. Dehumidifiers, air movers, and targeted removal of wet insulation are essential. Second, a careful inspection of the roof deck and attic plane. Look for darkened sheathing, rusted nails, and compressed insulation near the eaves. Third, permanent corrections after thaw: air sealing, insulation upgrades, ventilation adjustments, and in some cases, roof detail changes, such as extending ice and water membrane farther upslope or improving flashing around dormers and valleys.
In the living space, drywall repairs wait until moisture content drops below about 12 to 15 percent. Rushing joint compound onto damp paper invites peeling and bubbling. Expect two to three weeks in cold weather with active dehumidification. If a stain is small and the drywall is solid, a stain-blocking primer and paint may suffice. If the board is sagging or crumbles under hand pressure, cut back to clean edges and patch.
Why low pressure steam is the gold standard
I have tested heat cables, hot water hoses, gentle chipping, and improvised tarps. Nothing matches the control of professional ice dam steaming when the goal is to end a leak without making a new one. Steam flows into microcracks between ice and shingle, lifts the slab, and reduces the risk of shingle tear-out. The technique also protects gutter coatings and riveted seams. Low pressure steam ice removal allows a tech to sculpt narrow trenches and relieve pressure precisely where water is trapped. On complex roofs with valleys or skylights, that control is critical.
You might hear about roofing tablets or salt-filled stockings that melt paths. They can work in a pinch to create a channel through a small dam, but they also concentrate saline on aluminum and plantings. I avoid them unless the choice is between a minor cosmetic stain reliable commercial roof snow removal companies and immediate interior damage. If you use them once, rinse the gutter and siding thoroughly once temperatures allow.
The economics: cost, damage risk, and timing
The cost of an ice dam removal company typically reflects travel time, site complexity, and how much roof is involved. Urban jobs with tight access, steep pitches, or multiple dormers take longer. If there are frozen downspouts and frozen gutter removal on top of roof work, crews often bill a half day or full day. Homeowners sometimes ask if they can just hire a handyman. In midwinter, a lower rate can balloon quickly if the person arrives without steam, damages the shingles, or leaves the downspouts blocked so the next sunny day restarts the cycle. In plain terms, cheap ice removal that scars a roof is not cheap. Given that a roof replacement runs five figures in most markets, spending a fraction of that to protect the system is rational.
Timing matters. The best time to remove ice is during the early part of the day when the ice is hard and stable, before sun drives meltwater aggressively. Late afternoons can turn a working surface slick. Night work is possible under floodlights, but only on simple, low roofs. Safety comes first. A reputable roof ice removal service will postpone rather than push a risky setup. That pause is a sign of professionalism, not indifference.
Prevention that actually works
Roof ice is a symptom of heat loss and airflow patterns in the building. Address those and you cut the problem off at the root. I have yet to see a lasting solution that did not include air sealing at the attic plane. Warm air leaks at the tops of walls, around plumbing stacks, recessed lights, and attic hatches drive heat onto the roof. A weekend of targeted sealing with foam and fire-rated sealant can cut stack effect dramatically. Once air leaks are controlled, add insulation to reach at least code minimum for your climate, often R-38 to R-60 in northern zones. In many homes built before 2000, the eave area is thin and needs baffles to keep soffit vents clear. Without baffles, added insulation blocks airflow and can make ice worse. Quality baffles are rigid and extend several feet up the deck, not just a token inch.
Balanced ventilation matters, but it is not a cure-all. You want clear soffit intake and a continuous ridge vent or equivalent. Gable vents alone create dead zones. Power attic fans can depressurize the attic and pull warm, moist air from the living space, which backfires in winter. If you have a cathedral ceiling with no vent channel, consider a dense-pack insulation job combined with an ice and water membrane upgrade at the next reroof. For complex roofs with chronic problem areas, heat cables along the eaves can serve as a controlled mitigation. They should be on timers or thermostats and installed to manufacturer patterns. Heat cables do not fix building science issues, but they can reduce roof snow and ice damage in the worst weeks.
At grade, manage downspout discharge. If your downspouts dump onto a sidewalk or a short leader near the foundation, they will freeze and back up. Add extensions during winter and aim them to a sunny area if possible. Keep the ground sloped away from the house. These small adjustments decrease the frequency of calls for gutter ice blockage service.
Common mistakes I still see
I have walked onto jobs where someone laid a torch to an ice dam. The blackened shingles told the story. Heat without control ruins roofs. Another misstep is using metal shovels and steel rakes. They bite, they scratch, and they crush. Plastic tools are slower but safer. I also see homeowners trying to remove huge slabs of gutter ice in one go. That sudden weight shift can tear hangers and split seams. Patience works better. Let steam loosen the bond. Lift in small sections.
Inside, do not ignore small stains, especially near exterior walls. Those stains are early warnings. Waiting until spring can turn a small roof leak winter repair into a mold remediation project. On the flip side, do not panic at every icicle. If the attic is tight and ventilated and you only see a few small icicles after a storm, you may be fine. Context matters.
Choosing the right partner for roof ice removal
When you call around, you want a company that speaks clearly about method, safety, and scope. Ask whether they use professional ice dam steaming. Ask how they protect landscaping and siding from runoff. Ask whether they carry fall protection and how they stage ladders on ice. If a crew cannot describe frozen gutter removal and downspout thawing in a way that makes sense, keep dialing. References help. Photos help more. Look for close-ups of clean steam cuts through ice, not just faraway shots of a roof under snow.
Be wary of guarantees that sound too broad. No one can promise zero damage in all conditions. A roof already under stress may lose a shingle tab or two even with careful technique. A gutter that was sagging under load may settle after the ice is out. The honest promise is to minimize risk, use safe ice dam removal methods, and stand behind the work if something avoidable goes wrong.
A brief field note: when small fixes change the winter
A family in a 1970s split-level called after water dripped from their kitchen light during a January thaw. The roof slope faced west, and the eaves were short. They had recessed lights directly under the dam area, a classic setup for ice. We performed roof ice dam removal with steam, cleared a heavy gutter ridge, and thawed two downspouts. Inside, we opened a small section of attic, sealed the tops of partition walls, replaced six can lights with sealed LED fixtures rated for insulation contact, and installed baffles at the eaves before adding cellulose to R-49. The next winter, I drove by after a storm. Their neighbors had thick icicles. Their eaves were clear with a neat snow line ending at the vented soffit. A few hours of air sealing had done more for their home than years of heat cable bills.
What to expect after the thaw
If you managed a problem this winter, plan a spring checkup. Look for shingle tabs lifted by ice, gutters out of pitch, and fascia paint that bubbled. Any section that held an ice slab deserves a fastener check. In the attic, inspect the eaves for frost stains, especially above bathrooms and kitchens. Replace any insulation that stayed wet. A moisture meter is useful, but even a hand and a good nose work. If the roof is older than fifteen years and you have a history of winter water damage roof repairs, consider extending the ice and water membrane two to four feet farther upslope during the next reroof. That simple change can stop leaks even if a small dam forms.
If you installed heat cables, inspect them for abrasion and secure clips before the next season. If you rerouted downspouts above grade, return them to your normal summer configuration once the ground thaws and you can evaluate drainage properly.
A practical homeowner game plan
- Watch for early signs: ceiling stains near exterior walls, heavy icicles behind gutters, and slow drainage at downspout outlets after a thaw. Reduce risk immediately but safely: rake only the lower few feet of roof with a plastic rake, lower indoor humidity, and catch interior drips with controlled containment. Call a roof ice removal service that uses low pressure steam and handles roof and gutter ice removal together, including frozen downspout removal if needed. After the event, schedule air sealing and insulation upgrades at the attic plane, confirm clear soffit and ridge ventilation, and adjust downspout discharge. Reserve heat cables for persistent problem zones, installed to specification and controlled by a thermostat, not left on continuously.
The bottom line
Winter roof ice removal is a precision job. The goal is not just to make the roof look clear. It is to restore drainage paths without gouging shingles, to open gutters without twisting hangers, and to thaw downspouts without creating skating rinks at the foundation. When done with care, professional ice dam steaming ends a leak on the day it starts and preserves the roof for many winters. When paired with thoughtful improvements inside the attic, it can make ice dams a rare event rather than an annual headache. If you are staring at a growing stain or a gutter sagging under a white shell, act quickly and choose method over muscle. Your roof will thank you in spring.